How to root your Sony Xperia Z1 with 14.5.A.0.270 Firmware
In the past year, getting your trusty old Sony Xperia Z1 updated with the lastest firmware and then getting root access on it was a pain in the ass. It was only made easy by unlocking the bootloader. Unfortunately, that meant losing some functionality of the phone. However, this year the appearance of a new rooting software has made it possible to root the phone in just a few simple steps.
The new Lollipop 14.5.A.0.270 firmware is also very good. The camera now actually produces nice pictures in low light setting without much of the noise of the original Kitkat firmwares. What amazes me most is that Sony still supports this model with new firmware, I had half expected them to end support with KitKat.
Musings aside, lets get on with rooting your Xperia Z1 now.
1. First make sure you are running Lollipop 5.0.2 Build
14.5.A.0.242 / 14.5.A.0.270. Go to Settings > About to verify this. The method will work on all models
of Z1 running Build 14.5.A.0.270 and before.
2. Download KingRoot v4.5 and install it in your mobile. Get the APK file to install here (5MB). Transfer it to your phone via bluetooth or just email it to yourself and use the phone to download the file.
3. Open the KingRoot app from your mobile , Click on Start Root ,
the Rooting Process will start. ( You need to be connected to the internet) Wait for a couple minutes, usually it take less than a minute. You will be now granted root access!! :D How easy was that?
If you would like you can later replace Kingroot with SuperSU or SuperUser after getting root, but thats another tutorial I guess heh.. Have fun and enjoy the new Android Lollipop on your once again "BRAND NEW" Xperia Z1!
P.S. Looks like I will be upgrading to the new Xperia Z5 soon, looks like Sony has finally upped their game and come out with a winner.
Wednesday, September 9

Monday, December 8
Taiwan Trip 2011 Day 8 Green Island Zhaori Saltwater Hot Springs
[ continued from Taiwan Trip 2011 Day 7 Green Island Dinner ]
Zhaori Hot Spring (朝日溫泉)
[ The Zhaori Saltwater Hot Springs has been well known since the late 18th century for their clean, transparent water and ideal temperature, which fluctuates between 60 and 70 degrees centigrade. The springs are fed by seawater and underground water heated by the volcanic lava of Green Island. This is one of only three saltwater hot springs in the world along with the springs on Kyushu Island of Japan and Sicily in Italy. Zhaori has three open-air pools and a spa pool where visitors can listen to the sound of the surf, enjoy the sunrise, or watch the stars as they soak away the stress. ]
Source : Discover Taiwan Website
 After a few hours of sleep, we awoke early and quickly made our way to the Zhaori Hot Spring so as not to miss the sunrise.
 As we got there the sun began to rise. However there was a layer of clouds blocking it somewhat in the horizon.

Beside the open pools, there is a well like structure which is specially built for cooking eggs. You can purchase your eggs from the main entrance and hang them on these bamboo sticks in a cloth pouch, then lower it into the hot spring water. Sign actually says : Dangeroud High Temps, 95 degrees, careful when using.

As this was our first time here, we just found a big rock and hung our eggs over the side. This was gonna be our breakfast :D We then hurried off to the open pools to see the sunrise.

Some locals were already there, soaking up the seawater and waiting for the sunrise.

Sun finally coming up over the clouds...

Our first Taiwanese Island SUNRISE!! YAY!!
 After viewing the sunrise, we decided to try out the indoor pools. The water here was at 41.2C, but felt pretty hot compared with the open pool water. The indoor pool has nice waterfall spouts that you can stand under for a direct blast of salty hot spring water.
 We actually thought someone had taken our eggs from the hotspring as they were not there when we went back to get them. Luckily the guard at the entrance had our eggs! Someone had taken them from the hotspring and kindly passed them to him for safekeeping. *Whew and Yum!*
Finally it was time to go. We had to ride back to the Minsu and prepare for the morning activity of snorkeling.
Zhaori Hot Spring (朝日溫泉)
[ The Zhaori Saltwater Hot Springs has been well known since the late 18th century for their clean, transparent water and ideal temperature, which fluctuates between 60 and 70 degrees centigrade. The springs are fed by seawater and underground water heated by the volcanic lava of Green Island. This is one of only three saltwater hot springs in the world along with the springs on Kyushu Island of Japan and Sicily in Italy. Zhaori has three open-air pools and a spa pool where visitors can listen to the sound of the surf, enjoy the sunrise, or watch the stars as they soak away the stress. ]
Source : Discover Taiwan Website
After a few hours of sleep, we awoke early and quickly made our way to the Zhaori Hot Spring so as not to miss the sunrise. Beside the open pools, there is a well like structure which is specially built for cooking eggs. You can purchase your eggs from the main entrance and hang them on these bamboo sticks in a cloth pouch, then lower it into the hot spring water. Sign actually says : Dangeroud High Temps, 95 degrees, careful when using.
As this was our first time here, we just found a big rock and hung our eggs over the side. This was gonna be our breakfast :D We then hurried off to the open pools to see the sunrise.
Some locals were already there, soaking up the seawater and waiting for the sunrise.
Sun finally coming up over the clouds...
Our first Taiwanese Island SUNRISE!! YAY!!
Finally it was time to go. We had to ride back to the Minsu and prepare for the morning activity of snorkeling.
Taiwan Trip 2011 Day 7 Green Island Dinner
[continued from Taiwan Trip 2011 Day 7 : Yong Ya Fang Minsu 雍雅坊民宿 ]

Scootering into town, we decided to have dinner at this restaurant which was packed full. As always our theory was "packed full must be good".
 Inside it was pretty crowded but atmosphere was pretty cozy. Despite the crowd, it was not too noisy. Everyone seemed to be enjoying their food.
 Lots of framed posters of different types of local fish. Owner must be a fishing fan.

Walking in, on the front desk was a HUGE PILE of fried flying fish. We were very surprised and excited as this was the first time we ever had a chance to eat this type of fish. They serve it 3 ways, sweet and sour, braised or black pepper.

For rice, we decided to get a bowl of classic taiwanese mince braised pork rice. Pretty good.

Then came out main dish, the flying fish sweet and sour style! :D The fish has been battered and deep fried to crispy perfection so much so you could munch and crunch most of it. Flavour wise, the flying fish was a mild tasting fish. The sweet and sour sauce which was pretty good. But the novelty of eating this rare dish in a remote taiwanese island location is what makes it so special.

Our second main dish was some stir fried local DEER meat with ginger and shallots. Went very well with the rice. Green Island has a lot of resident deer population. I guess the locals just go hunt a couple everynight.

After dinner we went back to the minsu. As part of the package, we met up with a local guide who brought a group of us on scooters up a hill, nearby to the local deer sanctuary/park. The main attractions are the local buffalo and deer, which we managed to see but didn't manage to get any pictures. Also this green stick like insect which is indigenous to this island and not found anywhere else on earth!! Lucky us, there were plenty of them out and about for us to take pictures. They are pretty harmless but they are huge insects, many around the size of your elbow to hand!!

After our fun night outing, we passed by this very cutely decorated shop and went in for some ice dessert as the signboard read : "seaweed ice products"

And I am very glad we did. Another local specialty. It's basically a typical shaved ice with taro and sweet potato balls kind of dessert, except this one was topped off with some green seaweed harvested right from the shoreline of this Island. Served on a custom made clam-shell, this was a really nice way to end our first day on this island.
Well back to the Minsu for an early night, we would have to wake up pretty early for some sunrise viewing at the hot springs!!!
Join me next on Taiwan Trip 2011 Day 7 Green Island Zhaori Saltwater Hot Springs
Scootering into town, we decided to have dinner at this restaurant which was packed full. As always our theory was "packed full must be good".
Lots of framed posters of different types of local fish. Owner must be a fishing fan.Walking in, on the front desk was a HUGE PILE of fried flying fish. We were very surprised and excited as this was the first time we ever had a chance to eat this type of fish. They serve it 3 ways, sweet and sour, braised or black pepper.
For rice, we decided to get a bowl of classic taiwanese mince braised pork rice. Pretty good.
Then came out main dish, the flying fish sweet and sour style! :D The fish has been battered and deep fried to crispy perfection so much so you could munch and crunch most of it. Flavour wise, the flying fish was a mild tasting fish. The sweet and sour sauce which was pretty good. But the novelty of eating this rare dish in a remote taiwanese island location is what makes it so special.
Our second main dish was some stir fried local DEER meat with ginger and shallots. Went very well with the rice. Green Island has a lot of resident deer population. I guess the locals just go hunt a couple everynight.
After dinner we went back to the minsu. As part of the package, we met up with a local guide who brought a group of us on scooters up a hill, nearby to the local deer sanctuary/park. The main attractions are the local buffalo and deer, which we managed to see but didn't manage to get any pictures. Also this green stick like insect which is indigenous to this island and not found anywhere else on earth!! Lucky us, there were plenty of them out and about for us to take pictures. They are pretty harmless but they are huge insects, many around the size of your elbow to hand!!
After our fun night outing, we passed by this very cutely decorated shop and went in for some ice dessert as the signboard read : "seaweed ice products"
And I am very glad we did. Another local specialty. It's basically a typical shaved ice with taro and sweet potato balls kind of dessert, except this one was topped off with some green seaweed harvested right from the shoreline of this Island. Served on a custom made clam-shell, this was a really nice way to end our first day on this island.
Well back to the Minsu for an early night, we would have to wake up pretty early for some sunrise viewing at the hot springs!!!
Join me next on Taiwan Trip 2011 Day 7 Green Island Zhaori Saltwater Hot Springs
Monday, August 4
How to root your Sony Xperia Z1 with 14.4.A.0.108 Firmware
Wow in just a short month Sony has brought us another update for the Z1.
Once again, Sony has been very quick in releasing the latest but hopefully not the last update to the Sony Xperia Z1. This post will show you how to root you Sony Xperia Z1 with the new C6903 14.4.A.0.108 Android 4.4.4 KitKat Firmware in 2 Easy Steps.
**Disclaimer**
(No phones were abused in the flashing and rooting of this firmware)

Step 1: Upgrading to the new firmware version
Download the firmware FTF from your region here , courtesy of the cool guys at XDA Developers. I downloaded the C6903_14.4.A.0.108_Generic_SG_1276-7937_R3C firmware for Singapore, though I am using the phone in Australia as this version has chinese and japanese input support. If you already have this latest version on your phone you can skip this entire Step 1. However you will still need the Flashtool downloaded as that is also used for step 2.
Using FLASHTOOL (download here), make sure you have the latest version(0.9.16.0) and flash the C6903_14.4.A.0.108_Generic_SG_1276-7937_R3C FTF into your phone. To flash, turn off your phone then put into "Flashmode mode" by connecting usb cable with down volume button depressed to pc. Then click the lightning icon in flashtool and select flashmode. You will get option to select the firmware FTF you want to flash (make sure the firmware file is in the firmware folder of flashtool). Once finished you can reboot the phone or just disconnect from PC and continue with step 2.
Step 2: Flashing a Stock Kernel with CWM Recovery to get root.
You will need Doomlord’s Advanced Stock Kernel with CWM Recovery . This is a modified stock kernel which has a special touch recovery added as well as root permissions.
Once again launch FLASHTOOL, turn off phone and put into fastboot mode by connecting usb cable with up volume button depressed. Click the lightning icon and select fastboot mode then click on the right side select kernel to flash, select the unzipped boot.img file which you had just downloaded from above. Reboot and install SuperSU on your phone from the google play store for free, this will allow you to manage root for your apps easily.
Alternatively you can download SuperSU zip file from this link and copy it into your phone/sdcard. Then install it with the CWM Recovery. To use CWM Recovery just press up volume when you see the purple light after rebooting (purple light will come on every time you reboot phone if you done Step 2 correctly). Navigate the options in recovery to locate the SuperSU file and install.
I use Root Explorer to test my root status. It allows me to mount the phone in R/W mode then by editing build.prop I can add in a host name for my WiFi so my phone does not appear connected as some random android-12u9d32lifd32 numbers.

NOTE :: This process requires an unlocked Bootloader. If you have a locked bootloader check out my other post here for info on how to unlock it. or you use the BLU icon in flashtool to unlock your bootloader. Either way you will need the code from Sony.
In total it took me less than 10 minutes to flash and root. So good luck with the flashing and feel free to comment as below.
Once again, Sony has been very quick in releasing the latest but hopefully not the last update to the Sony Xperia Z1. This post will show you how to root you Sony Xperia Z1 with the new C6903 14.4.A.0.108 Android 4.4.4 KitKat Firmware in 2 Easy Steps.
**Disclaimer**
(No phones were abused in the flashing and rooting of this firmware)
Step 1: Upgrading to the new firmware version
Download the firmware FTF from your region here , courtesy of the cool guys at XDA Developers. I downloaded the C6903_14.4.A.0.108_Generic_SG_1276-7937_R3C firmware for Singapore, though I am using the phone in Australia as this version has chinese and japanese input support. If you already have this latest version on your phone you can skip this entire Step 1. However you will still need the Flashtool downloaded as that is also used for step 2.
Using FLASHTOOL (download here), make sure you have the latest version(0.9.16.0) and flash the C6903_14.4.A.0.108_Generic_SG_1276-7937_R3C FTF into your phone. To flash, turn off your phone then put into "Flashmode mode" by connecting usb cable with down volume button depressed to pc. Then click the lightning icon in flashtool and select flashmode. You will get option to select the firmware FTF you want to flash (make sure the firmware file is in the firmware folder of flashtool). Once finished you can reboot the phone or just disconnect from PC and continue with step 2.
 |
| Android KitKat 4.4.4 Build 14.4.A.0.108 |
Step 2: Flashing a Stock Kernel with CWM Recovery to get root.
You will need Doomlord’s Advanced Stock Kernel with CWM Recovery . This is a modified stock kernel which has a special touch recovery added as well as root permissions.
Once again launch FLASHTOOL, turn off phone and put into fastboot mode by connecting usb cable with up volume button depressed. Click the lightning icon and select fastboot mode then click on the right side select kernel to flash, select the unzipped boot.img file which you had just downloaded from above. Reboot and install SuperSU on your phone from the google play store for free, this will allow you to manage root for your apps easily.
Alternatively you can download SuperSU zip file from this link and copy it into your phone/sdcard. Then install it with the CWM Recovery. To use CWM Recovery just press up volume when you see the purple light after rebooting (purple light will come on every time you reboot phone if you done Step 2 correctly). Navigate the options in recovery to locate the SuperSU file and install.
I use Root Explorer to test my root status. It allows me to mount the phone in R/W mode then by editing build.prop I can add in a host name for my WiFi so my phone does not appear connected as some random android-12u9d32lifd32 numbers.
NOTE :: This process requires an unlocked Bootloader. If you have a locked bootloader check out my other post here for info on how to unlock it. or you use the BLU icon in flashtool to unlock your bootloader. Either way you will need the code from Sony.
In total it took me less than 10 minutes to flash and root. So good luck with the flashing and feel free to comment as below.
Wednesday, May 28
How to install the latest Skype full version offline.
Skype keeps updating its software every few weeks and if like me, you have a few laptops in your home and don't want to download each upgrade multiple times, or if you would like a copy of the full Skype installer so you can install it when you are offline, then this is for you.
Just click here to download the latest Windows PC / Laptop version of the full Skype installer which is about 34MB at the moment. You can then install Skype on your Windows PC or Laptop even if you are not online. Have fun!
Just click here to download the latest Windows PC / Laptop version of the full Skype installer which is about 34MB at the moment. You can then install Skype on your Windows PC or Laptop even if you are not online. Have fun!
Wednesday, May 7
Turn off the Ipod Nano backlight when charging
After searching on the net for a bit, I finally found out how to turn off the backlight on my wife's Ipod nano 3rd generation.
SIMPLE SOLUTION - Eject the Ipod after plugging it into the PC. Whether you do it in itunes or by using the option in windows folder (right click your device and choose eject) it works either way.
Apparently if you just disconnect manually by removing the USB cable without first ejecting, the Ipod Nano will be left in the partially PC connected mode and the backlight won't ever switch off. Also it won't start charging when you use a wall charger.
SIMPLE SOLUTION - Eject the Ipod after plugging it into the PC. Whether you do it in itunes or by using the option in windows folder (right click your device and choose eject) it works either way.
Apparently if you just disconnect manually by removing the USB cable without first ejecting, the Ipod Nano will be left in the partially PC connected mode and the backlight won't ever switch off. Also it won't start charging when you use a wall charger.
Saturday, May 3
How to root your Sony Xperia Z1 with C6903 14.3.A.0.757 Firmware
I have been a little late to flash my phone to the latest firmware but hey, just moved and the internet was not connected for a whole month!!!
Once again, Sony has been very quick in releasing the latest but hopefully not the last update to the Sony Xperia Z1. This post will show you how to root you Sony Xperia Z1 with C6903 14.3.A.0.757 Android 4.4 KitKat Firmware in 2 Easy Steps.

Step 1: Upgrade to the new firmware version
Download the firmware FTF from your region here , courtesy of the cool guys at XDA Developers. I downloaded the C6903 14.3.A.0.757 Generic SG 1276-7937_R3C firmware for Singapore, though I am using the phone in Australia as this version has chinese and japanese input support. If you already have this latest version on your phone you can skip this entire Step 1. However you will still need the Flashtool downloaded as that is also used for step 2.
Using FLASHTOOL (download here), make sure you have the latest 0.9.16.0 version and flash the C6903 14.3.A.0.757 Generic SG 1276-7937_R3C FTF into your phone. To flash, turn off your phone then put into Flashmode mode by connecting usb cable with down volume button depressed to pc. Then click the lightning icon in flashtool and select flashmode. You will get option to select the firmware FTF you want to flash.(make sure the firmware file is in the firmware folder of flashtool)

Step 2:
You will need Doomlord’s Advanced Stock Kernel with CWM Recovery . Once again launch FLASHTOOL, turn off phone and put into fastboot mode by connecting usb cable with up volume button depressed. Click the lightning icon and select fastboot mode then click on the right side select kernel to flash, select the unzipped boot.img file which you had just downloaded from above. Reboot and install SuperSU on your phone from the google play store for free and you will then have root with SuperSU.
NOTE :: This process requires an unlocked Bootloader. If you have a locked bootloader check out my other post here for info on how to unlock it. or you can try to use flashtool the BLU icon to unlock your bootloader. Either way you will need the code from Sony.
Addit :: In case installing SuperSU does not give you root access, you will have to download the SuperSU zip file from this link , copy it into your phone/sdcard and install it with the CWM Recovery. To use CWM Recovery just press up volume when you see the purple light after rebooting (purple light will come on every time you reboot phone if you done Step 2 correctly).

In total it took me less than 15 minutes to flash and root. So good luck with the flashing and feel free to comment as below. Also enjoy the new Android Kit Kat 4.4.2 Easter egg! Hint : tap and hold the screen after you get the red Android KitKat screen :D
Once again, Sony has been very quick in releasing the latest but hopefully not the last update to the Sony Xperia Z1. This post will show you how to root you Sony Xperia Z1 with C6903 14.3.A.0.757 Android 4.4 KitKat Firmware in 2 Easy Steps.
Step 1: Upgrade to the new firmware version
Download the firmware FTF from your region here , courtesy of the cool guys at XDA Developers. I downloaded the C6903 14.3.A.0.757 Generic SG 1276-7937_R3C firmware for Singapore, though I am using the phone in Australia as this version has chinese and japanese input support. If you already have this latest version on your phone you can skip this entire Step 1. However you will still need the Flashtool downloaded as that is also used for step 2.
Using FLASHTOOL (download here), make sure you have the latest 0.9.16.0 version and flash the C6903 14.3.A.0.757 Generic SG 1276-7937_R3C FTF into your phone. To flash, turn off your phone then put into Flashmode mode by connecting usb cable with down volume button depressed to pc. Then click the lightning icon in flashtool and select flashmode. You will get option to select the firmware FTF you want to flash.(make sure the firmware file is in the firmware folder of flashtool)
Step 2:
You will need Doomlord’s Advanced Stock Kernel with CWM Recovery . Once again launch FLASHTOOL, turn off phone and put into fastboot mode by connecting usb cable with up volume button depressed. Click the lightning icon and select fastboot mode then click on the right side select kernel to flash, select the unzipped boot.img file which you had just downloaded from above. Reboot and install SuperSU on your phone from the google play store for free and you will then have root with SuperSU.
NOTE :: This process requires an unlocked Bootloader. If you have a locked bootloader check out my other post here for info on how to unlock it. or you can try to use flashtool the BLU icon to unlock your bootloader. Either way you will need the code from Sony.
Addit :: In case installing SuperSU does not give you root access, you will have to download the SuperSU zip file from this link , copy it into your phone/sdcard and install it with the CWM Recovery. To use CWM Recovery just press up volume when you see the purple light after rebooting (purple light will come on every time you reboot phone if you done Step 2 correctly).
In total it took me less than 15 minutes to flash and root. So good luck with the flashing and feel free to comment as below. Also enjoy the new Android Kit Kat 4.4.2 Easter egg! Hint : tap and hold the screen after you get the red Android KitKat screen :D
Monday, March 24
How to root Sony Xperia Z1 C6903 with 14.3.A.0.681 Firmware Android KitKat 4.4.2
Please check out my latest post on updating and rooting the new 14.3.A.0.757 firmware
Hi all,
Once again, Sony has been very quick in releasing the latest but hopefully not the last update to the Sony Xperia Z1. This post will show you how to root you Sony Xperia Z1 C6903 with 14.3.A.0.681 Android 4.4 KitKat Firmware in 2 Easy Steps.

Step 1: Upgrade to the new firmware version
Download the firmware FTF from your region here , courtesy of the cool guys at XDA Developers. I downloaded the C6903 14.3.A.0.757 Generic SG 1276-7937_R3C firmware for Singapore, though I am using the phone in Australia as this version has Chinese and Japanese input support which I sometimes need to use.
Using FLASHTOOL, make sure you have the latest 0.9.15.0 version and flash the C6903 14.3.A.0.757 Generic SG 1276-7937_R3C FTF into your phone.
Step 2:
You will need Doomlord’s CWM-Based Recovery 6.0.4.7 + ROOT for Xperia Z1 . Once again using FLASHTOOL put the device into fastboot mode by connecting usb cable with up volume button depressed. Then select the img file and you will get CWM Recovery and root on your device!
N.B. This process requires unlocked Bootloader.
Enjoy the new Android Kit Kat 4.4.2 Easter egg! Hint : tap and hold the screen after you get the red Android KitKat screen :D
Monday, February 3
How to root your Sony Xperia Z1 C6903 with 14.2.A.1.136 firmware
UPDATE : Please check out my latest post on updating and rooting the new 14.3.A.0.757 firmware
This is how I put root on my Sony Xperia Z1 with the latest firmware C6903_14.2.A.1.136_SingTel SG 1276-7941_R4B which Sony is currently rolling out in February. This is still a Android 4.3 JellyBean based version with some minor upgrades from the previous firmware. Mainly a white balance function for those who were unlucky enough to get a yellow screen and didn't manage to get it replaced. As mentioned before my screen was the renasys one which was pretty good but the brightness was too much.
Oh before I forget, Happy Chinese New Year to all. What a great year of the horse this is going to be!
PHASE 1 : Download all the needed software
My .290 firmware was only partially rooted as I had decided previously I wanted to keep the bootloader locked for warranty reasons. But my phone has been washed and dropped a couple times without any problems, so should not be needing any RMA soon. Also I read a post about a user flashing and bricking the phone and Sony still warrantied it anyways. In addition, yummy Android KitKat 4.4 will be out soon and I dun wanna have to be waiting for some way to root without unlocking the bootloader whilst everyone else is having fun with their rooted phones...
So the first thing is to unlock the bootloader on the phone. Well like anyother flashing operation, some preparation work is needed. Below is a list of stuff you should download first.
1) If you do not have PC companion installed, you may have to get the SONY XPERIA Z1 USB Drivers at developer.sonymobile.com installed.
2) Also needed are the unlock bootloader code (follow the instructions from Sony, you will need a working email for this) and
3) Fastboot software (for unlocking bootloader)
4) Now I am downloading a very very BIG FTF Firmware file from MEGA, the new megaupload (900MB++) You can grab the version you fancy from here.
5) Backup TA from here this is for backing up your DRM keys. (You will have to be running a rooted phone to do this. You can find out how to root the phone using .534 firmware from one of my earlier posts.)
Ok off to cook dinner whilst the files get downloaded.........
..........Just finished a nice papaya fish soup and mushroom fried egg dinner, back to tinkering.
PHASE 2 : REMEMBER TO BACKUP TA PARTITION.
Lucky I remembered, apparently contains some DRM Keys from Sony which are specific to my phone and essential for the X-Reality/Bravia engine thingy in it to run properly. Should get something like what I got below using a program called Backup TA v9.10
 Just press Y and it will backup for you.

Phase 3 : UNLOCK THE FREAKING BOOTLOADER ALREADY
Ok now that my TA is backed up, next I can start unlocking my bootloader. Ohhhh exciting, first time I am unlocking any bootloader of any kind. Off the phone and put it in Fastboot Mode by pressing the up volume rocker as you connect the USB cable to the PC.

In the cmd windows type in fastboot.exe -i 0x0fce getvar version
If a value is returned (it will return 0.5), it means the phone is correctly connected.
Type in fastboot.exe -i 0x0fce oem unlock 0xKEY and replace KEY with the key which u received earlier. Disconnect after reboot, green android comes out on first reboot then phone turns off and reboot again like a normal reset. All my data gone as warned...
You can double check that the bootloader is unlocked via this secret code *#*#7378423#*#* on the keypad. This brings up a hidden service menu. Select the Service info then Configuration. You should see something like the pic above.
PHASE 4 : Flashing the C6903 14.2.A.1.136 firmware with flashtool.
Nothing special here, just the usual ftf firmware flash with flashtool-0.9.11.0. I actually spent freaking 2 hours trying to flash my phone with version 0.9.13.0 until I downloaded the 9.11 version. the 0.9.13.0 newer version seems to be screwed on my laptop and installs the wrong S1 device driver to interface with the phone. The 9.11 version installs detects and installs the phone as SEMC device when in flashmode and the firmware flashes fine. If your flashtool is working fine with the .290 firmware flashing then just leave it alone, no need to update.
PHASE 5 :
Root with the awesome CWM-Based Recovery 6.0.4.6 Touch Recovery for Xperia Z1
(Includes the stock kernel and CWM recovery which is used to root.) Detailed instructions are in the link. I flashed mine with flashtool though which has a fastboot mode.
NOTE :
RELOCKING BOOTLOADER is possible and I did it by restoring the TA Backup with the TA Backup Program which I had used before. Unfortunately it had the effect of softbricking my Xperia Z1. Luckily I just had to reflash the stock firmware again to boot and repeat the process of unlocking my bootloader again to install the kernel to root.
So now I have full root for the 14.2.A.1.136 firmware on my phone. My bootloader is still unlocked but I think Sony will happily warranty my phone as the only things I am running are stock firmware and stock kernel, with only difference is root and CWM recovery added which definitely won't affect the phone adversely.
So far .136 looks to be very stable and fast and energy efficient and I haven't had any problems with it yet so once again, looking forward to KitKat 4.4!!!
Hope you manage to root your phone and please follow or add my blog to your RSS! I will definitely be rooting KitKat 4.4 when it becomes available for this fantastic phone :D
Please check out my latest post on updating and rooting the new 14.3.A.0.757 firmware
This is how I put root on my Sony Xperia Z1 with the latest firmware C6903_14.2.A.1.136_SingTel SG 1276-7941_R4B which Sony is currently rolling out in February. This is still a Android 4.3 JellyBean based version with some minor upgrades from the previous firmware. Mainly a white balance function for those who were unlucky enough to get a yellow screen and didn't manage to get it replaced. As mentioned before my screen was the renasys one which was pretty good but the brightness was too much.
Oh before I forget, Happy Chinese New Year to all. What a great year of the horse this is going to be!
PHASE 1 : Download all the needed software
My .290 firmware was only partially rooted as I had decided previously I wanted to keep the bootloader locked for warranty reasons. But my phone has been washed and dropped a couple times without any problems, so should not be needing any RMA soon. Also I read a post about a user flashing and bricking the phone and Sony still warrantied it anyways. In addition, yummy Android KitKat 4.4 will be out soon and I dun wanna have to be waiting for some way to root without unlocking the bootloader whilst everyone else is having fun with their rooted phones...
So the first thing is to unlock the bootloader on the phone. Well like anyother flashing operation, some preparation work is needed. Below is a list of stuff you should download first.
1) If you do not have PC companion installed, you may have to get the SONY XPERIA Z1 USB Drivers at developer.sonymobile.com installed.
2) Also needed are the unlock bootloader code (follow the instructions from Sony, you will need a working email for this) and
3) Fastboot software (for unlocking bootloader)
4) Now I am downloading a very very BIG FTF Firmware file from MEGA, the new megaupload (900MB++) You can grab the version you fancy from here.
5) Backup TA from here this is for backing up your DRM keys. (You will have to be running a rooted phone to do this. You can find out how to root the phone using .534 firmware from one of my earlier posts.)
Ok off to cook dinner whilst the files get downloaded.........
..........Just finished a nice papaya fish soup and mushroom fried egg dinner, back to tinkering.
PHASE 2 : REMEMBER TO BACKUP TA PARTITION.
Lucky I remembered, apparently contains some DRM Keys from Sony which are specific to my phone and essential for the X-Reality/Bravia engine thingy in it to run properly. Should get something like what I got below using a program called Backup TA v9.10
Phase 3 : UNLOCK THE FREAKING BOOTLOADER ALREADY
Ok now that my TA is backed up, next I can start unlocking my bootloader. Ohhhh exciting, first time I am unlocking any bootloader of any kind. Off the phone and put it in Fastboot Mode by pressing the up volume rocker as you connect the USB cable to the PC.
In the cmd windows type in fastboot.exe -i 0x0fce getvar version
If a value is returned (it will return 0.5), it means the phone is correctly connected.
Type in fastboot.exe -i 0x0fce oem unlock 0xKEY and replace KEY with the key which u received earlier. Disconnect after reboot, green android comes out on first reboot then phone turns off and reboot again like a normal reset. All my data gone as warned...
 |
| Sony Xperia Z1 with Bootloader Unlocked |
PHASE 4 : Flashing the C6903 14.2.A.1.136 firmware with flashtool.
Nothing special here, just the usual ftf firmware flash with flashtool-0.9.11.0. I actually spent freaking 2 hours trying to flash my phone with version 0.9.13.0 until I downloaded the 9.11 version. the 0.9.13.0 newer version seems to be screwed on my laptop and installs the wrong S1 device driver to interface with the phone. The 9.11 version installs detects and installs the phone as SEMC device when in flashmode and the firmware flashes fine. If your flashtool is working fine with the .290 firmware flashing then just leave it alone, no need to update.
PHASE 5 :
Root with the awesome CWM-Based Recovery 6.0.4.6 Touch Recovery for Xperia Z1
(Includes the stock kernel and CWM recovery which is used to root.) Detailed instructions are in the link. I flashed mine with flashtool though which has a fastboot mode.
 |
| Sony Xperia Z1 with root and 14.2.A.1.136 installed |
NOTE :
RELOCKING BOOTLOADER is possible and I did it by restoring the TA Backup with the TA Backup Program which I had used before. Unfortunately it had the effect of softbricking my Xperia Z1. Luckily I just had to reflash the stock firmware again to boot and repeat the process of unlocking my bootloader again to install the kernel to root.
So now I have full root for the 14.2.A.1.136 firmware on my phone. My bootloader is still unlocked but I think Sony will happily warranty my phone as the only things I am running are stock firmware and stock kernel, with only difference is root and CWM recovery added which definitely won't affect the phone adversely.
So far .136 looks to be very stable and fast and energy efficient and I haven't had any problems with it yet so once again, looking forward to KitKat 4.4!!!
Hope you manage to root your phone and please follow or add my blog to your RSS! I will definitely be rooting KitKat 4.4 when it becomes available for this fantastic phone :D
Please check out my latest post on updating and rooting the new 14.3.A.0.757 firmware
Tuesday, December 31
How to root your C6903 Sony Xperia Z1 with 14.2.A.0.290 firmware
UPDATE : Please check out my latest post on updating and rooting the new 14.3.A.0.757 firmware
How to root your Sony Xperia Z1 with C6903 14.3.A.0.757 firmware
Hi all,
thanks for dropping by. This will be a really short post as the instructions to do this are pretty much same as the previous update. In fact please refer to my previous post for a more detailed process.
Basically all you have to do is flash the previous .534 version firmware. Root it with Kingo Root or whatever root software that works, then upgrade via OTA with the survival mode in SuperSU ticked to "preserve root". Do make sure you factory reset the phone before doing the OTA, otherwise there is a chance that like my phone, the OTA update failed.
That aside if you do get the OTA installed successully over the rooted .534, then you end up with a partial root. You can access root priviledges for certain things, but like for example if you want to edit system files like build.prop then it doesn't work.
Of course to obtain absolute root is still possible. You just gotta get your bootloader unlocked which in version .290 the camera still works. Unfortunately unlocking bootloader risks voiding your warranty with Sony..
So my advice is if you have .257 still rooted and working, then forget about upgrading to .290 as there is not much improvement with a loss of the root. 4.3 is pretty much same as 4.2.2. The default sony camera app still sucks ass as much, so you still have to install a third party app like Camera Zoom FX or alternative camera app from samsung or LG.
Will post up a pic of my upgraded OS and how to root to .290 without unlocking bootloader if that happens.
==== UPDATE 19/1/2014 ====
Root with .290 is now possible without unlocking the bootloader, unfortunately so far only one version of FTF has been released for rooting which means I will be skipping this for now.
However in a couple days time I will be downloading the .290 FTF(firmware file) for Singapore and unlocking my bootloader to get root the more normal way. This method needs an extra step of backup of the TA partition before unlocking bootloader so as to be able to relock the bootloader after rooting, in case of future warranty issues.
How to root your Sony Xperia Z1 with C6903 14.3.A.0.757 firmware
Hi all,
thanks for dropping by. This will be a really short post as the instructions to do this are pretty much same as the previous update. In fact please refer to my previous post for a more detailed process.
Basically all you have to do is flash the previous .534 version firmware. Root it with Kingo Root or whatever root software that works, then upgrade via OTA with the survival mode in SuperSU ticked to "preserve root". Do make sure you factory reset the phone before doing the OTA, otherwise there is a chance that like my phone, the OTA update failed.
That aside if you do get the OTA installed successully over the rooted .534, then you end up with a partial root. You can access root priviledges for certain things, but like for example if you want to edit system files like build.prop then it doesn't work.
Of course to obtain absolute root is still possible. You just gotta get your bootloader unlocked which in version .290 the camera still works. Unfortunately unlocking bootloader risks voiding your warranty with Sony..
So my advice is if you have .257 still rooted and working, then forget about upgrading to .290 as there is not much improvement with a loss of the root. 4.3 is pretty much same as 4.2.2. The default sony camera app still sucks ass as much, so you still have to install a third party app like Camera Zoom FX or alternative camera app from samsung or LG.
Will post up a pic of my upgraded OS and how to root to .290 without unlocking bootloader if that happens.
==== UPDATE 19/1/2014 ====
Root with .290 is now possible without unlocking the bootloader, unfortunately so far only one version of FTF has been released for rooting which means I will be skipping this for now.
However in a couple days time I will be downloading the .290 FTF(firmware file) for Singapore and unlocking my bootloader to get root the more normal way. This method needs an extra step of backup of the TA partition before unlocking bootloader so as to be able to relock the bootloader after rooting, in case of future warranty issues.
Sunday, November 3
How to root your Sony Xperia Z1 with C6903 14.1.G.2.257 firmware
And give it an Orgasm. Yes you read it right, HOT off the press. If you have managed to update your sexy Sony Xperia Z1 smartphone from .534 firmware to the .257 firmware, then odds are your root is gone. Unless you had SuperSU Pro and Root and updated by OTA...
Anyways easy peasy, this is how I did it. Ok here goes the steps...
**Disclaimer**
(No phones were abused in the flashing and rooting of this firmware)
Step 1 : Make sure you have C6903 14.1.G.1.534 firmware version on your Sony Xperia Z1 smartphone. If you have some other version then refer to my flashing guide here to flash it to the 14.1.G.1.534 version. [ When selecting your .534 version FTF to flash, make sure the OTA updates are available in those regions. For me, I used the Singtel C6903 14.1.G.1.534 FTF. You can also use the UK FTF as there is a .237 OTA for that version as well.]
Step 2 : We need to root the .534 firmware.Get your Kingo Android ROOT software from here, then install it and run it. It will download some device driver software from the internet and install some stuff, not need to worry just let it run. Connect your phone via USB to the PC/Laptop (make sure the USB debugging option is turned on in the phone before you connect to computer via USB cable). Once your phone is connected, a big shiny orange ROOT button in Kingo ROOT will appear, just click that and let it run for a bit. It will reboot your phone a couple times. When it says your phone is rooted means everything is A-OK, you have root for the .534 firmware. Yay!!! Remember to remove your phone from the USB at this stage.
This extra step if you do not know how to enable USB debugging : [On Android 4.2 and higher, the Developer options screen is hidden by default. To make it available, go to Settings > About phone and tap Build number seven times. Return to the previous screen to find {Developer options} Tap on this and make sure that the 'Enable Debugging over USB' is ticked.]
Step 3 : We need to upgrade SuperSU 1.65 to PRO version to enable the Survival Mode for OTA updates. You can buy it from the google play store for 2+ bucks or.... After you install the PRO version, reboot your Z1 phone and click on SuperSU, the option to enable Survival mode should now be available.

Step 4 : We now have C6903 14.1.G.1.534 firmware with root and SuperSU Pro survival mode turned on. Time to connect via Wifi or 4G and phone will alert you to download the 14.1.G.2.257 firmware update via OTA. Surprisingly this update is only 80MB+. Download it quickly and phone will reboot.
If you check your apps, SuperSU will still be there and you will still have root access! Congrats you are now one of the few ELITE Sony Xperia Z1 users with 14.1.G.2.257 firmware running with ROOT. Imagine the possibilities...
UPDATE : Please check out my latest post on updating and rooting the new 14.3.A.0.757 firmware
How to root your Sony Xperia Z1 with C6903 14.3.A.0.757 firmware
Anyways easy peasy, this is how I did it. Ok here goes the steps...
**Disclaimer**
(No phones were abused in the flashing and rooting of this firmware)
Step 1 : Make sure you have C6903 14.1.G.1.534 firmware version on your Sony Xperia Z1 smartphone. If you have some other version then refer to my flashing guide here to flash it to the 14.1.G.1.534 version. [ When selecting your .534 version FTF to flash, make sure the OTA updates are available in those regions. For me, I used the Singtel C6903 14.1.G.1.534 FTF. You can also use the UK FTF as there is a .237 OTA for that version as well.]
Step 2 : We need to root the .534 firmware.Get your Kingo Android ROOT software from here, then install it and run it. It will download some device driver software from the internet and install some stuff, not need to worry just let it run. Connect your phone via USB to the PC/Laptop (make sure the USB debugging option is turned on in the phone before you connect to computer via USB cable). Once your phone is connected, a big shiny orange ROOT button in Kingo ROOT will appear, just click that and let it run for a bit. It will reboot your phone a couple times. When it says your phone is rooted means everything is A-OK, you have root for the .534 firmware. Yay!!! Remember to remove your phone from the USB at this stage.
This extra step if you do not know how to enable USB debugging : [On Android 4.2 and higher, the Developer options screen is hidden by default. To make it available, go to Settings > About phone and tap Build number seven times. Return to the previous screen to find {Developer options} Tap on this and make sure that the 'Enable Debugging over USB' is ticked.]
Step 3 : We need to upgrade SuperSU 1.65 to PRO version to enable the Survival Mode for OTA updates. You can buy it from the google play store for 2+ bucks or.... After you install the PRO version, reboot your Z1 phone and click on SuperSU, the option to enable Survival mode should now be available.

Step 4 : We now have C6903 14.1.G.1.534 firmware with root and SuperSU Pro survival mode turned on. Time to connect via Wifi or 4G and phone will alert you to download the 14.1.G.2.257 firmware update via OTA. Surprisingly this update is only 80MB+. Download it quickly and phone will reboot.
If you check your apps, SuperSU will still be there and you will still have root access! Congrats you are now one of the few ELITE Sony Xperia Z1 users with 14.1.G.2.257 firmware running with ROOT. Imagine the possibilities...
UPDATE : Please check out my latest post on updating and rooting the new 14.3.A.0.757 firmware
How to root your Sony Xperia Z1 with C6903 14.3.A.0.757 firmware
Thursday, October 17
Sony Xperia Z1 : How to flash new firmware update Version 14.1.G.2.257
The new firmware for my Sony Xperia Z1 (C6903) mobile phone was released 2 days ago. Unfortunately in Australia, even though the new update is listed on the website as
Android version: Google Android 4.2 (Jelly Bean)
Latest available software: 14.1.G.2.257
Release started: 2013-10-15
If you try to update your phone, it will just say you have the latest update.
Anyhow I would just like to show you guys how to flash the new C6903 14.1.G.2.257 firmware to your phone. To get root on this firmware, refer to my other post here. Good thing is there are improvements mainly for the camera/video software and screen color/brightness. These seem to be the biggest problem areas in the previous firmware, causing lousy noisy pictures and a yellow tint on some user's screens.
Well just follow these complex steps and you will soon have the latest firmware this October on your Shiny New Sony Xperia Z1 smart phone!
Step 1 : Download and install FLASHTOOL from here
Step 2 : Download the Firmware FTF file 14.1.G.2.257 here (800+MB). Then copy it into the C:\Flashtool\firmwares folder (if you had use the default installation settings for FLASHTOOL)
**N.B** You can also download the C6903 14.1.G.1.534 firmware from XDA-developers forum Mega FTF Collection here. Join the forum if you are unable to access the links. Get the Singapore or UK ones which have OTA updates already. Let me know if you successfully OTA any other versions.
Step 3 : Startup flashtool. Make sure USB debugging is turned on before proceeding.
[On Android 4.2 and higher, the Developer options screen is hidden by default. To make it available, go to Settings > About phone and tap Build number seven times. Return to the previous screen to find {Developer options} Tap on this and make sure that the 'Enable Debugging over USB' is ticked. Also goto setting->xperia connectivity->usb connectivity->usb connection mode-> make it msc mode. also setting->security->check unknown sources.]
Step 4 : Shutdown your phone then press the volume down key and connect the USB cable. You should see flashtool detect the phone in "flash mode"
Step 5 : Click the lightning icon in flashtool and you will get a pop-up with 2 options, select the first one "flashmode". In the left column select the 14.1.G.2.257 firmware then just click flash button on the bottom right. Flashing takes a few minutes only.
Step 6 : When its done the message log will say something like connected in flashmode again. Once you see nothing more happening in the message log, you can disconnect the USB from your computer and reboot the phone manually with the power button.
Things to note :
1) Make sure you have sufficient battery before flashing, 30%+ should be enough.
2) If you wanna keep all your settings and date, just deselect the ticks for appslog, cache and data in the screen where you select the firmware.. I did this and phone works beautifully as before the flash.
If you did it all ok, You should get something like this under settings -> About phone..

so did you flash your phone successfully? let me know in the comments section below.
Android version: Google Android 4.2 (Jelly Bean)
Latest available software: 14.1.G.2.257
Release started: 2013-10-15
If you try to update your phone, it will just say you have the latest update.
Anyhow I would just like to show you guys how to flash the new C6903 14.1.G.2.257 firmware to your phone. To get root on this firmware, refer to my other post here. Good thing is there are improvements mainly for the camera/video software and screen color/brightness. These seem to be the biggest problem areas in the previous firmware, causing lousy noisy pictures and a yellow tint on some user's screens.
Well just follow these complex steps and you will soon have the latest firmware this October on your Shiny New Sony Xperia Z1 smart phone!
Step 1 : Download and install FLASHTOOL from here
Step 2 : Download the Firmware FTF file 14.1.G.2.257 here (800+MB). Then copy it into the C:\Flashtool\firmwares folder (if you had use the default installation settings for FLASHTOOL)
**N.B** You can also download the C6903 14.1.G.1.534 firmware from XDA-developers forum Mega FTF Collection here. Join the forum if you are unable to access the links. Get the Singapore or UK ones which have OTA updates already. Let me know if you successfully OTA any other versions.
Step 3 : Startup flashtool. Make sure USB debugging is turned on before proceeding.
[On Android 4.2 and higher, the Developer options screen is hidden by default. To make it available, go to Settings > About phone and tap Build number seven times. Return to the previous screen to find {Developer options} Tap on this and make sure that the 'Enable Debugging over USB' is ticked. Also goto setting->xperia connectivity->usb connectivity->usb connection mode-> make it msc mode. also setting->security->check unknown sources.]
Step 4 : Shutdown your phone then press the volume down key and connect the USB cable. You should see flashtool detect the phone in "flash mode"
Step 5 : Click the lightning icon in flashtool and you will get a pop-up with 2 options, select the first one "flashmode". In the left column select the 14.1.G.2.257 firmware then just click flash button on the bottom right. Flashing takes a few minutes only.
Step 6 : When its done the message log will say something like connected in flashmode again. Once you see nothing more happening in the message log, you can disconnect the USB from your computer and reboot the phone manually with the power button.
Things to note :
1) Make sure you have sufficient battery before flashing, 30%+ should be enough.
2) If you wanna keep all your settings and date, just deselect the ticks for appslog, cache and data in the screen where you select the firmware.. I did this and phone works beautifully as before the flash.
If you did it all ok, You should get something like this under settings -> About phone..

so did you flash your phone successfully? let me know in the comments section below.
Thursday, October 10
My sexy new Sony Xperia Z1 White Review
 |
| Sony Xperia Z1 Phone Box Front |
After a long awaited 2 weeks after pre-ordering, my sexy new Sony Xperia Z1 phone arrived! This following is my tiny tech review.
Pre-ordered for AUD $720 from Sony Center Brisbane, thanks to the price matchers in Melbourne. Normally they sell it for $779 pre-order.
 |
| Sony Xperia Z1 Phone Box Back |
 |
| Sony Xperia Z1 Phone Box Opened |
 |
| Sony Xperia Z1 White Front |
The phone does feel and look very very premium and the extra weight gives it a bit of heft. Definitely not a lady's phone, but also definitely NOT a brick. Compared to the Samsung Galaxy S2 and S3's I have used in the past, the phone is much bigger.
The 5 inch screen, covered with DragonTrail Glass and a screen protector, is the first smartphone screen that can be used in sunlight. Of note is the bit of backlight bleeding coming through the top edge of the screen but it is not really noticeable unless you display a pure black picture with the brightness cranked to maximum.
Seriously I don't know what the fuss is about the colors being faded when viewed at 45 degree angle. I could still see stuff on the screen quite well even at a 45 degree angle. AMOLED screens may be more colorful but when viewed normally, the display is fantastic, especially playing videos, just like a mini Bravia TV. My unit also did not have the yellow tint present on some other batches.
 |
| Sony Xperia Z1 White Back |
I was almost thinking of returning the phone, but after installing the Samsung S4 Google Edition Camera app, the pictures turned out much better. Though the S4 app does not have a 20 megapixel mode, at least for indoor pictures, the noise is gone and at least its reassuring to know that the noisy pictures are a software problem, not a hardware problem. This major problem should be solved in the next software update (update 22/10/2013 : for the new firmware .237 the camera is slightly better in low light but still not as good as could be. Software still needs to be improved guys...)
Battery life on this phone is superb, in standby mode with stamina mode on and not using the phone, it only loses about 2% of charge overnight! yes 2%. I charged it to 100% before bed time and next day it was at 98%. Amazing!!
 |
| Sony Xperia Z1 Underwater |
All in all, this is probably THE BEST smartphone on the market today. Ladies should probably consider the Galaxy S4 or the new LG G2. Guys, if you have the money, get one ASAP. Just do an immediate return if you get one of those dreadful yellow tinge(a few hard resets can solve the problem) or blue tinge screens. Also always remember to take your phone for a swim or shower once you buy it as a few units have been known to leak.
Tune in soon for my Xperia Z1 rooting and S4 Camera/Gallery installation guide.
Friday, July 12
Taiwan Trip 2011 Day 7 : Yong Ya Fang Minsu 雍雅坊民宿
[continued from Taiwan Trip 2011 Day 7 : Journey to Green Island via Fugang Harbour ]

As the ferry neared the harbour at Green Island, the rain stopped. The sky did remain overcast, a constant reminder that mother nature could churn up a typhoon anytime she pleased. I was happy to have "survived" the 50min long ferry ride to Green Island, funny thing was my wife was totally fine, despite polishing off most of the sushi!
As the ferry neared the harbour at Green Island, the rain stopped. The sky did remain overcast, a constant reminder that mother nature could churn up a typhoon anytime she pleased. I was happy to have "survived" the 50min long ferry ride to Green Island, funny thing was my wife was totally fine, despite polishing off most of the sushi!
Saturday, July 6
Bioshock Infinite PC : A Mind Boggling FPS

Thursday, June 20

Wednesday, June 19
Taiwan Trip 2011 Day 7 Journey to Green Island Lyudao 綠島 via Fugang Harbour
[continued from Taiwan Trip 2011 Day 6 Liyu Lake and Hualien at Night ]
 Today I will cover our travels from Hualien township to the Green Island (otherwise known as Lyudao 綠島 locally) Of course, must start the day off with some traditional Taiwanese breakfast rite? We each had a small box of typical Taiwanese egg pancake and hot some soybean milk. Got this from the shop just below our hotel.
Wednesday, March 13
Taiwan Trip 2011 Day 6 Liyu Lake and Hualien at Night
[continued from Taiwan Trip 2011 Day 6 Hualien Chishingtan Katsuo Museum ]

After enjoying the breeze and views at the Chishingtan beach, we travelled south towards another tourist attraction called Liyu Lake.
After enjoying the breeze and views at the Chishingtan beach, we travelled south towards another tourist attraction called Liyu Lake.
Sunday, January 27
Taiwan Trip 2011 Day 6 Hualien Chishingtan Katsuo Museum
[continued from Taiwan Trip Day 5 Nanbin Night Market Hualien ]
Day 6 in Taiwan and today we will be going via scooter to the Chishingtan beach and the Chishingtan Katsuo Museum.
 Hualien train station from our hotel room. Tour buses ferrying tourists, many from mainland china are especially plentiful on weekends.
As we scootered around looking for breakfast, we came by this stall by chance.

Apparently it is quite a famous dessert shop. It is a small corner shop with a competitor selling similiar stuff next door. I must say this is the place to eat tapioca balls. Much nicer tapioca balls than even those made by the grandmothers in Jiufen! As you can see from the picture, I thought this place was selling waffles! That's why we went in for breakfast!
But only after sitting down did we realise they were selling icy cold tapioca ball desserts and drinks.

We promptly ordered the house special. It is a mega big bowl of tapioca balls, soft tofu and green beans covered by shaved ice, drizzled with brown sugar syrup and milk. The tapioca balls are different colours due to yam, sweet potato, green bean and other natural ingredients used. This is the one that you should order.
After our dessert breakfast, we headed out for the Chishingtan Katsuo Museum.It is just a short ride from Hualien city to the Chishingtan Katsuo Museum.
This museum is built on the site of a former bonito production factory. Unfortunately they don't smoke this fish at this facility anymore.
Just outside the Museum entrance, there is a canteen area with stalls all around selling local seafood here. Time for brunch!

Lots of local delicacies sold here. Just order and pay at the main counter and wait for you order. We ordered a plate of flame seared tuna sashimi as it looked really special. In fact the preparation of it was quite a spectacle as you will see below.
 The fish meat is first seared with hot flames from the BBQ pit made by burning hay. Hay burns at very high heat for only a short time, so this fella has to quickly light the fire and sear the fish before the flames die down...

The flame seared tuna meat, still mostly raw inside is then passed on to this other fellow.

The meat is then thickly sliced and some ginger juice is squeezed on it.
Because this was done over a fire as opposed to using a gas flame like most restaurants do, you get the extra smokey flavour which is so much better, just like BBQ meat done over a charcoal fire. Served with soy sauce, garlic and shallots. Very very nice!
 Takopachi octopus balls smothered with the famous katsuo flakes on top with mayo and wasabi sauce. sooo yummy... This is a must have when you are travelling around Taiwan.
 Sunfish fishball soup with bits of chinese parsley. First time for us eating this type of fishball. Quite nice, texture was a bit like beef balls though hahaha...
Another dish smothered with the famous local bonito flakes. Basically some cold noodles tossed with some wet and dry seaweed in addition to the bonito flakes and topped with shallots. Flavour was good and the noodles were bouncy. I really liked the plate :D

Before stepping into the Museum, most visitors would obsess with taking pics of the fish in this salt water aquarium.
 All sorts of sea anemones, colourful clams and fish. Taiwan does have some really nice coral reefs as we were to find out later in the trip when we visited the Green Island (lyudao island).
 Unlike some other tourist buildings and places, the Chishingtan Katsuo Museum looked quite new and well maintained.
This is basically a small double storey museum with exhibits showing the history of the ocean and beaches around Hualien.
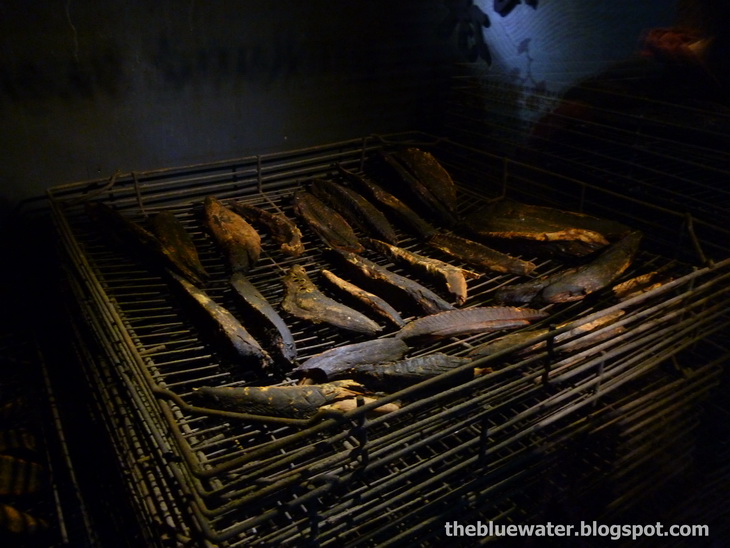 This exhibit shows how the bonito fish were smoked in the past. The fish are put on racks and smoked for months with specially selected firewood like apple or peach wood which imbue the special smokey flavour into the bonito. They end up like pieces of hard wood.
 Some old machines used to make flakes out of the dried smoked fish.
 More aquariums inside the museum. Local seahorse, coral prawn, camouflaged squid and cute little tigerfish.
 There is also a tank with a MONSTER GROUPER in it! Longer than my arm!! DO NOT PUT YOUR HAND IN THE TANK!!
After you have had your fun looking at the fish, you can go upstairs to look at the history of the fishery in the sea around Hualien.

We were lucky to see this. Some workers were making huge bags of bonito flakes. So at least some remnant of the old factory still remains. This place was closed when we visited again in 2012.
 These are bonito flakes and smoked tuna flakes for sale. It says welcome to try, please open the cover.
 Those bored by the museum stuff will no doubt be happy with the gift/food shop. All the seafood products are nicely package and make excellent gifts.
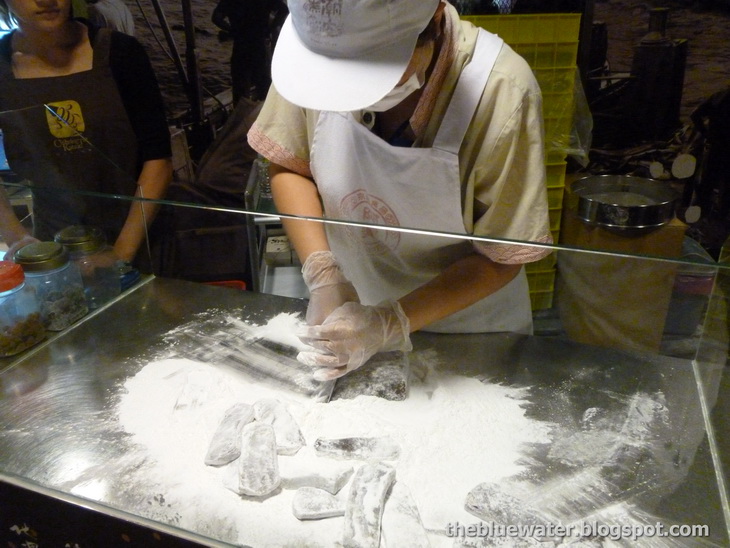 In case you don't like or are allergic to seafood, they even sell fresh hand made mochi which Hualien is famous for.
Shopping done, we walked around the place a little bit.
 There was a row of houses where the local fishermen and their families lived behind the museum. They even had their own chicken and bird cages! Nothing like a fresh raw egg in the morning.
 Having done the museum we scootered on down to the beach which we had passed by on a previous night. There is an airbase next to the beach. I managed to sneak a picture of what was probably an F-16 fighter jet parked in its own cement bunker.


Chishingtan beach is a very very long pebble beach with quite a nice breeze and has an endless ocean view into the horizon.
You can see some fishing boats with long nets fishing offshore.
 Every now and then airplanes will fly by as well. Managed to get a shot of a military cargo plane flying by. Looks like the one from Con-Air.
After some time enjoying the breeze at the beach we headed towards our next destination south of Hualien, the Liyu Lake.
[continue reading Taiwan Trip 2011 Day 6 Liyu Lake and Hualien at Night ]
Day 6 in Taiwan and today we will be going via scooter to the Chishingtan beach and the Chishingtan Katsuo Museum.
As we scootered around looking for breakfast, we came by this stall by chance.
Apparently it is quite a famous dessert shop. It is a small corner shop with a competitor selling similiar stuff next door. I must say this is the place to eat tapioca balls. Much nicer tapioca balls than even those made by the grandmothers in Jiufen! As you can see from the picture, I thought this place was selling waffles! That's why we went in for breakfast!
 |
| Menu |
But only after sitting down did we realise they were selling icy cold tapioca ball desserts and drinks.
We promptly ordered the house special. It is a mega big bowl of tapioca balls, soft tofu and green beans covered by shaved ice, drizzled with brown sugar syrup and milk. The tapioca balls are different colours due to yam, sweet potato, green bean and other natural ingredients used. This is the one that you should order.
After our dessert breakfast, we headed out for the Chishingtan Katsuo Museum.It is just a short ride from Hualien city to the Chishingtan Katsuo Museum.
Chishingtan Katsuo Museum
 |
| Chishingtan Katsuo Museum |
This museum is built on the site of a former bonito production factory. Unfortunately they don't smoke this fish at this facility anymore.
Just outside the Museum entrance, there is a canteen area with stalls all around selling local seafood here. Time for brunch!
Lots of local delicacies sold here. Just order and pay at the main counter and wait for you order. We ordered a plate of flame seared tuna sashimi as it looked really special. In fact the preparation of it was quite a spectacle as you will see below.
The fish meat is first seared with hot flames from the BBQ pit made by burning hay. Hay burns at very high heat for only a short time, so this fella has to quickly light the fire and sear the fish before the flames die down... The flame seared tuna meat, still mostly raw inside is then passed on to this other fellow.
The meat is then thickly sliced and some ginger juice is squeezed on it.
 |
| flame seared tuna sashimi |
Because this was done over a fire as opposed to using a gas flame like most restaurants do, you get the extra smokey flavour which is so much better, just like BBQ meat done over a charcoal fire. Served with soy sauce, garlic and shallots. Very very nice!
 |
| Seaweed Cold Noodles |
Before stepping into the Museum, most visitors would obsess with taking pics of the fish in this salt water aquarium.
All sorts of sea anemones, colourful clams and fish. Taiwan does have some really nice coral reefs as we were to find out later in the trip when we visited the Green Island (lyudao island). |
| Different species of tuna |
After you have had your fun looking at the fish, you can go upstairs to look at the history of the fishery in the sea around Hualien.
We were lucky to see this. Some workers were making huge bags of bonito flakes. So at least some remnant of the old factory still remains. This place was closed when we visited again in 2012.
Shopping done, we walked around the place a little bit.
Chishingtan beach is a very very long pebble beach with quite a nice breeze and has an endless ocean view into the horizon.
 |
| Chishingtan beach 3 |
You can see some fishing boats with long nets fishing offshore.
After some time enjoying the breeze at the beach we headed towards our next destination south of Hualien, the Liyu Lake.
[continue reading Taiwan Trip 2011 Day 6 Liyu Lake and Hualien at Night ]